Hardware Press Plans And Instructions
 The Hardware Press is built from a foundation of the standard letter size paper. The frame that moves under the press, or coffin, must accommodate this piece of paper. All the measurements in this document are approximate. You may have to adjust, as wood sizes vary in measurement, even within the same piece of lumber. Also, even when we practice measure twice and cut once, sometimes measurements made while cutting drift. As you build the press, keep a piece of letter sized paper around to check against.
For each step we will include a parts list at the top of the step. Where there are possible variations in assembly procedures, design elements, or other commentary, I will use a hyperlinked footnote that is hyperlinked to the annotation at the bottom of this page.
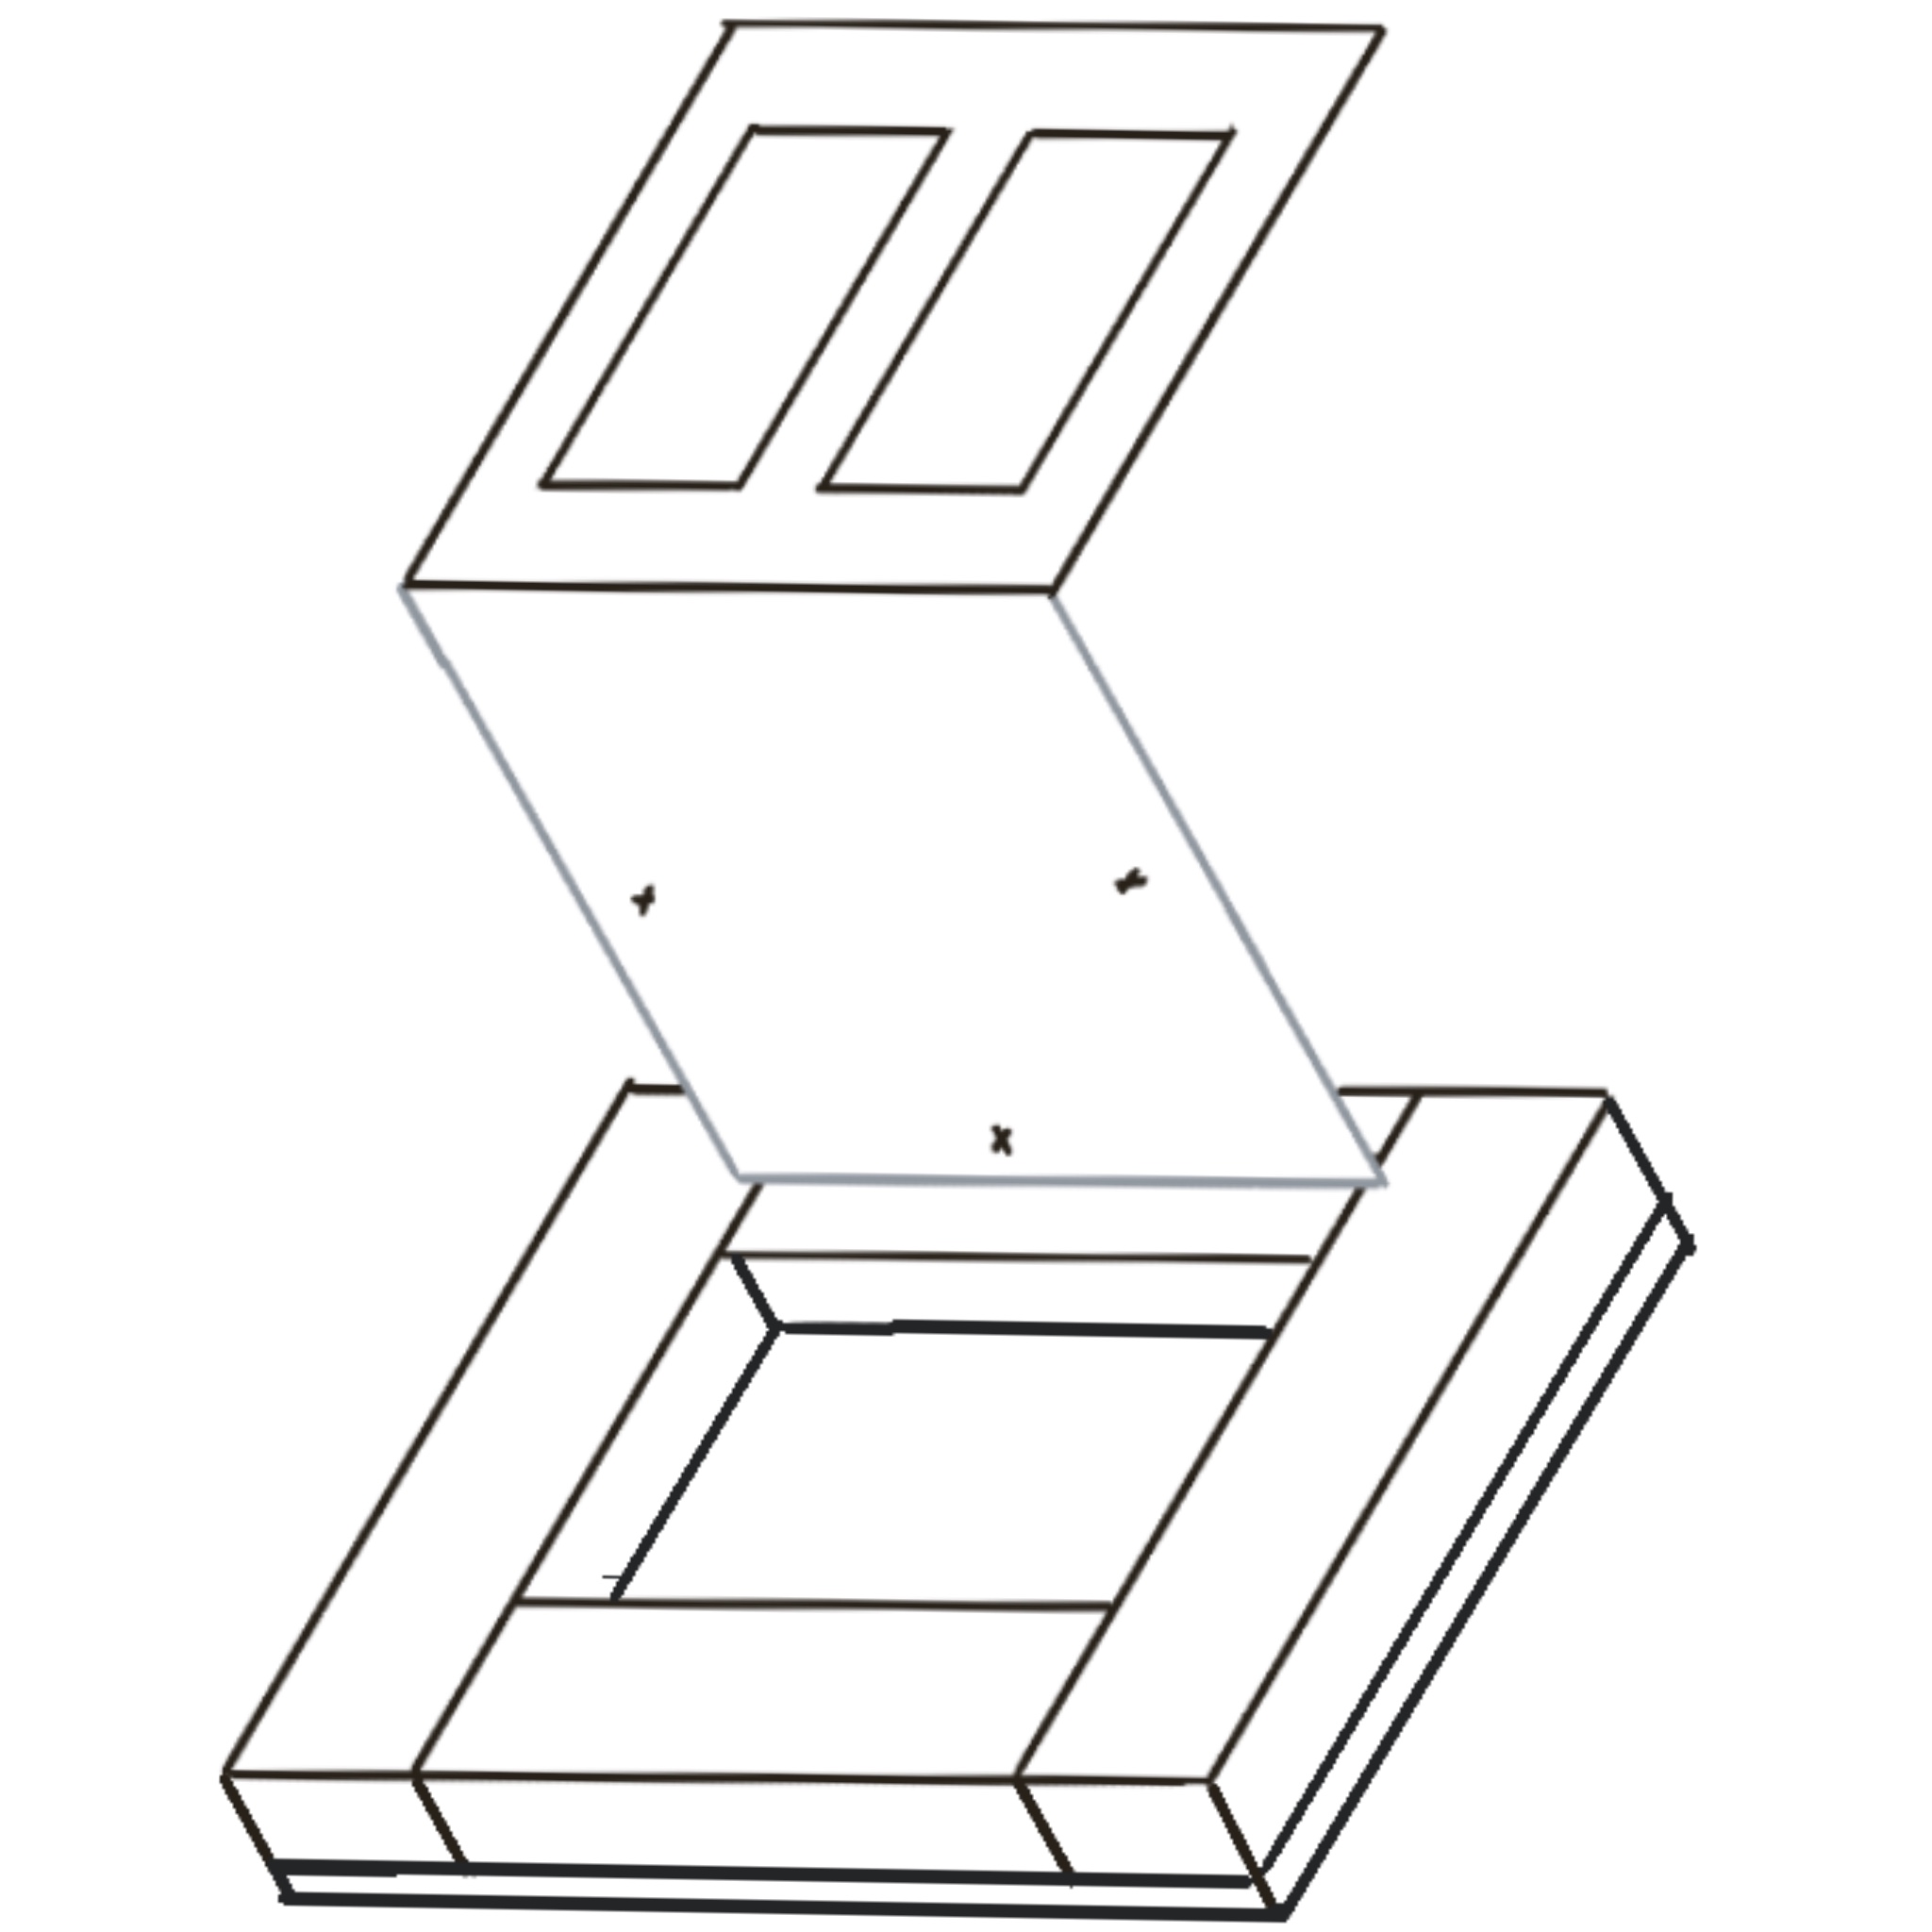
Part 1: The Print Coffin
The tray of the printing press that the type is set in, and that moves under the platen to make the print. This has to slide in the bed of the press for the press to be functional. As a result, it’s best to build this first so that you can adjust the other measurements around what you find after you assemble the coffin.
For this step you will need:
- One 18” by 15.5” piece of plywood
- Two 15.5” pieces of 2x4
- Two 11” pieces of 2x4
- Wood glue
- 14 1” construction screws
- Cut the wood to match the required measurements.
- Check the fit by placing a piece of letter paper in the center of the plywood, and arrange the pieces of 2x4 into a border around it. It is ok to have a little bit of looseness in this assembly.
- If there are not any major defects in the measurement of the wood, then remove each piece of 2x4, marking its borders with a pencil.
- Begin to construct the tray by gluing the wide edge of one piece of 2x4 (we recommend starting with one of the 15.5” pieces).
- Place the glued surface against the plywood, aligning it with the appropriate pencil outline.
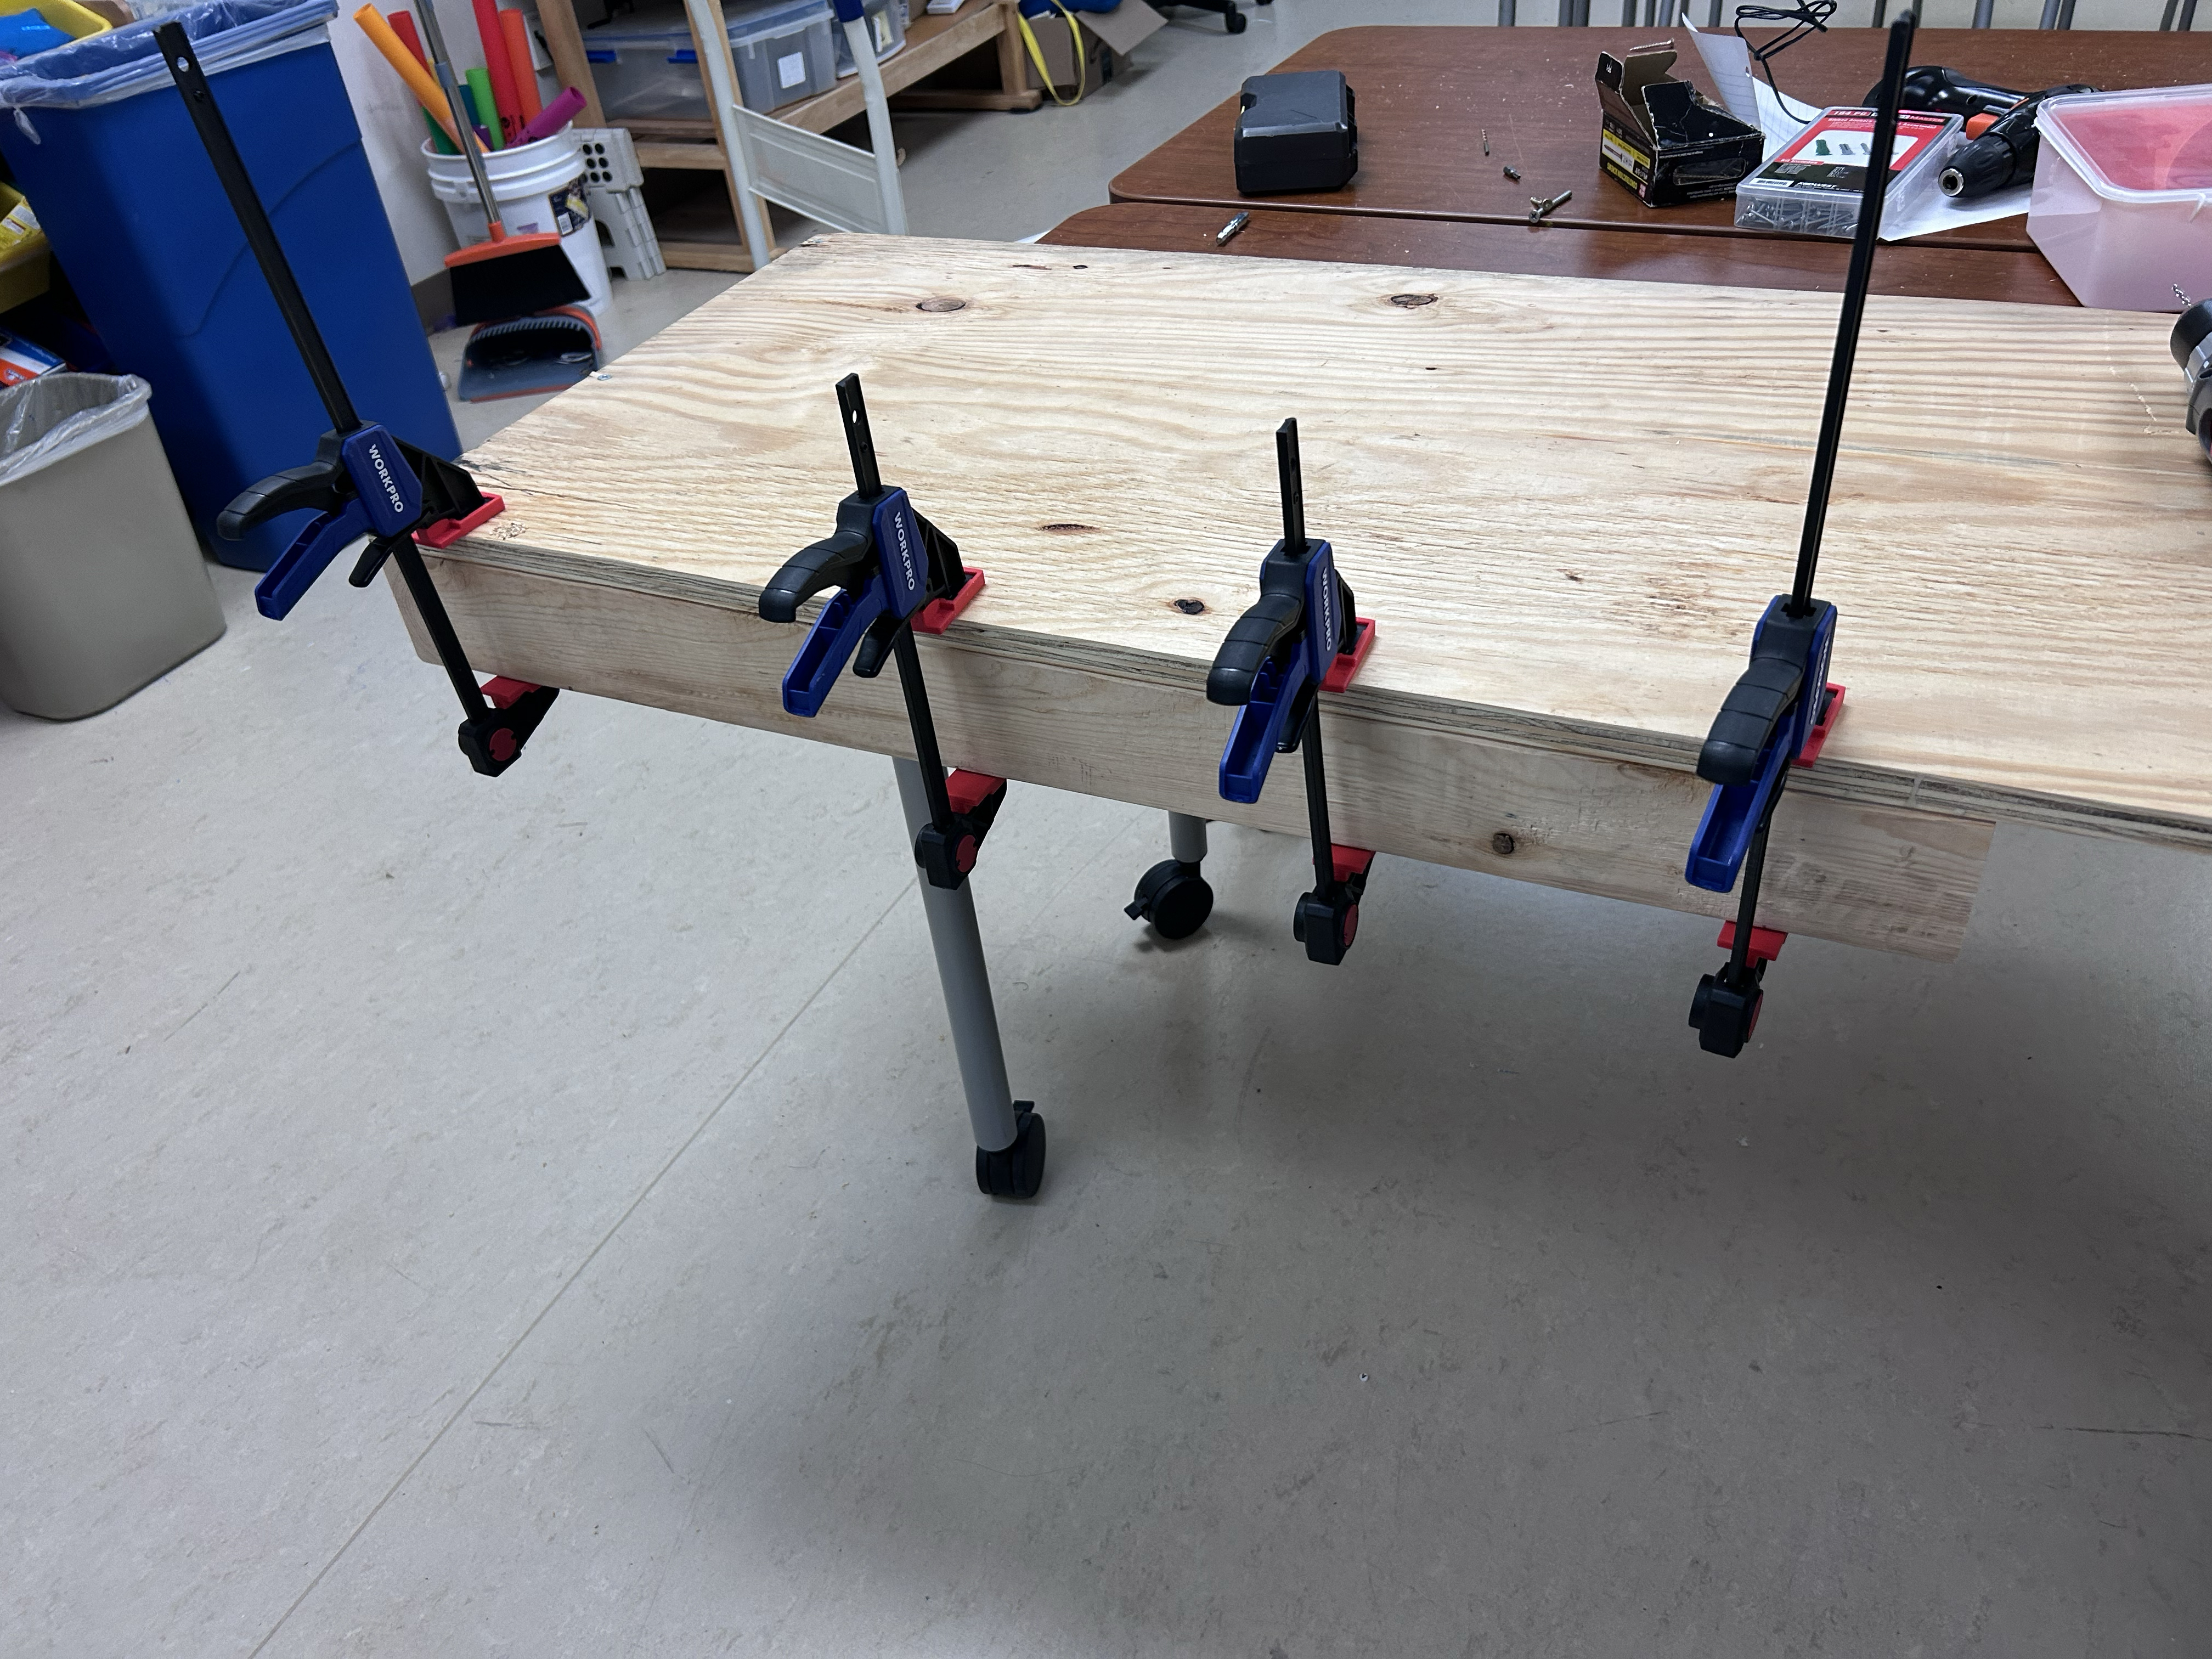
- Clamp the piece of wood in position using 2 hand clamps, and flip the tray plywood side up.
- Use a drill to secure the plywood to the 2x4 using 4 construction screws (3 if you started with an 11” piece). So you’re putting the screws into the 2x4 through the plywood. It is best to evenly space them, but precision is not required.
- Tighten each screw so that the screw is flush against the plywood. If you have difficulty achieving this with only a Phillips head bit, use a drill bit to drill pilot holes. Note: If a screw is resisting being flush, you can unscrew it 1/4 of an inch and re-screw it from this position, and it may sink deeper into the plywood the second time.
- Repeat steps 4-8 for each of the remaining pieces. We recommend checking against the paper multiple times during this process.
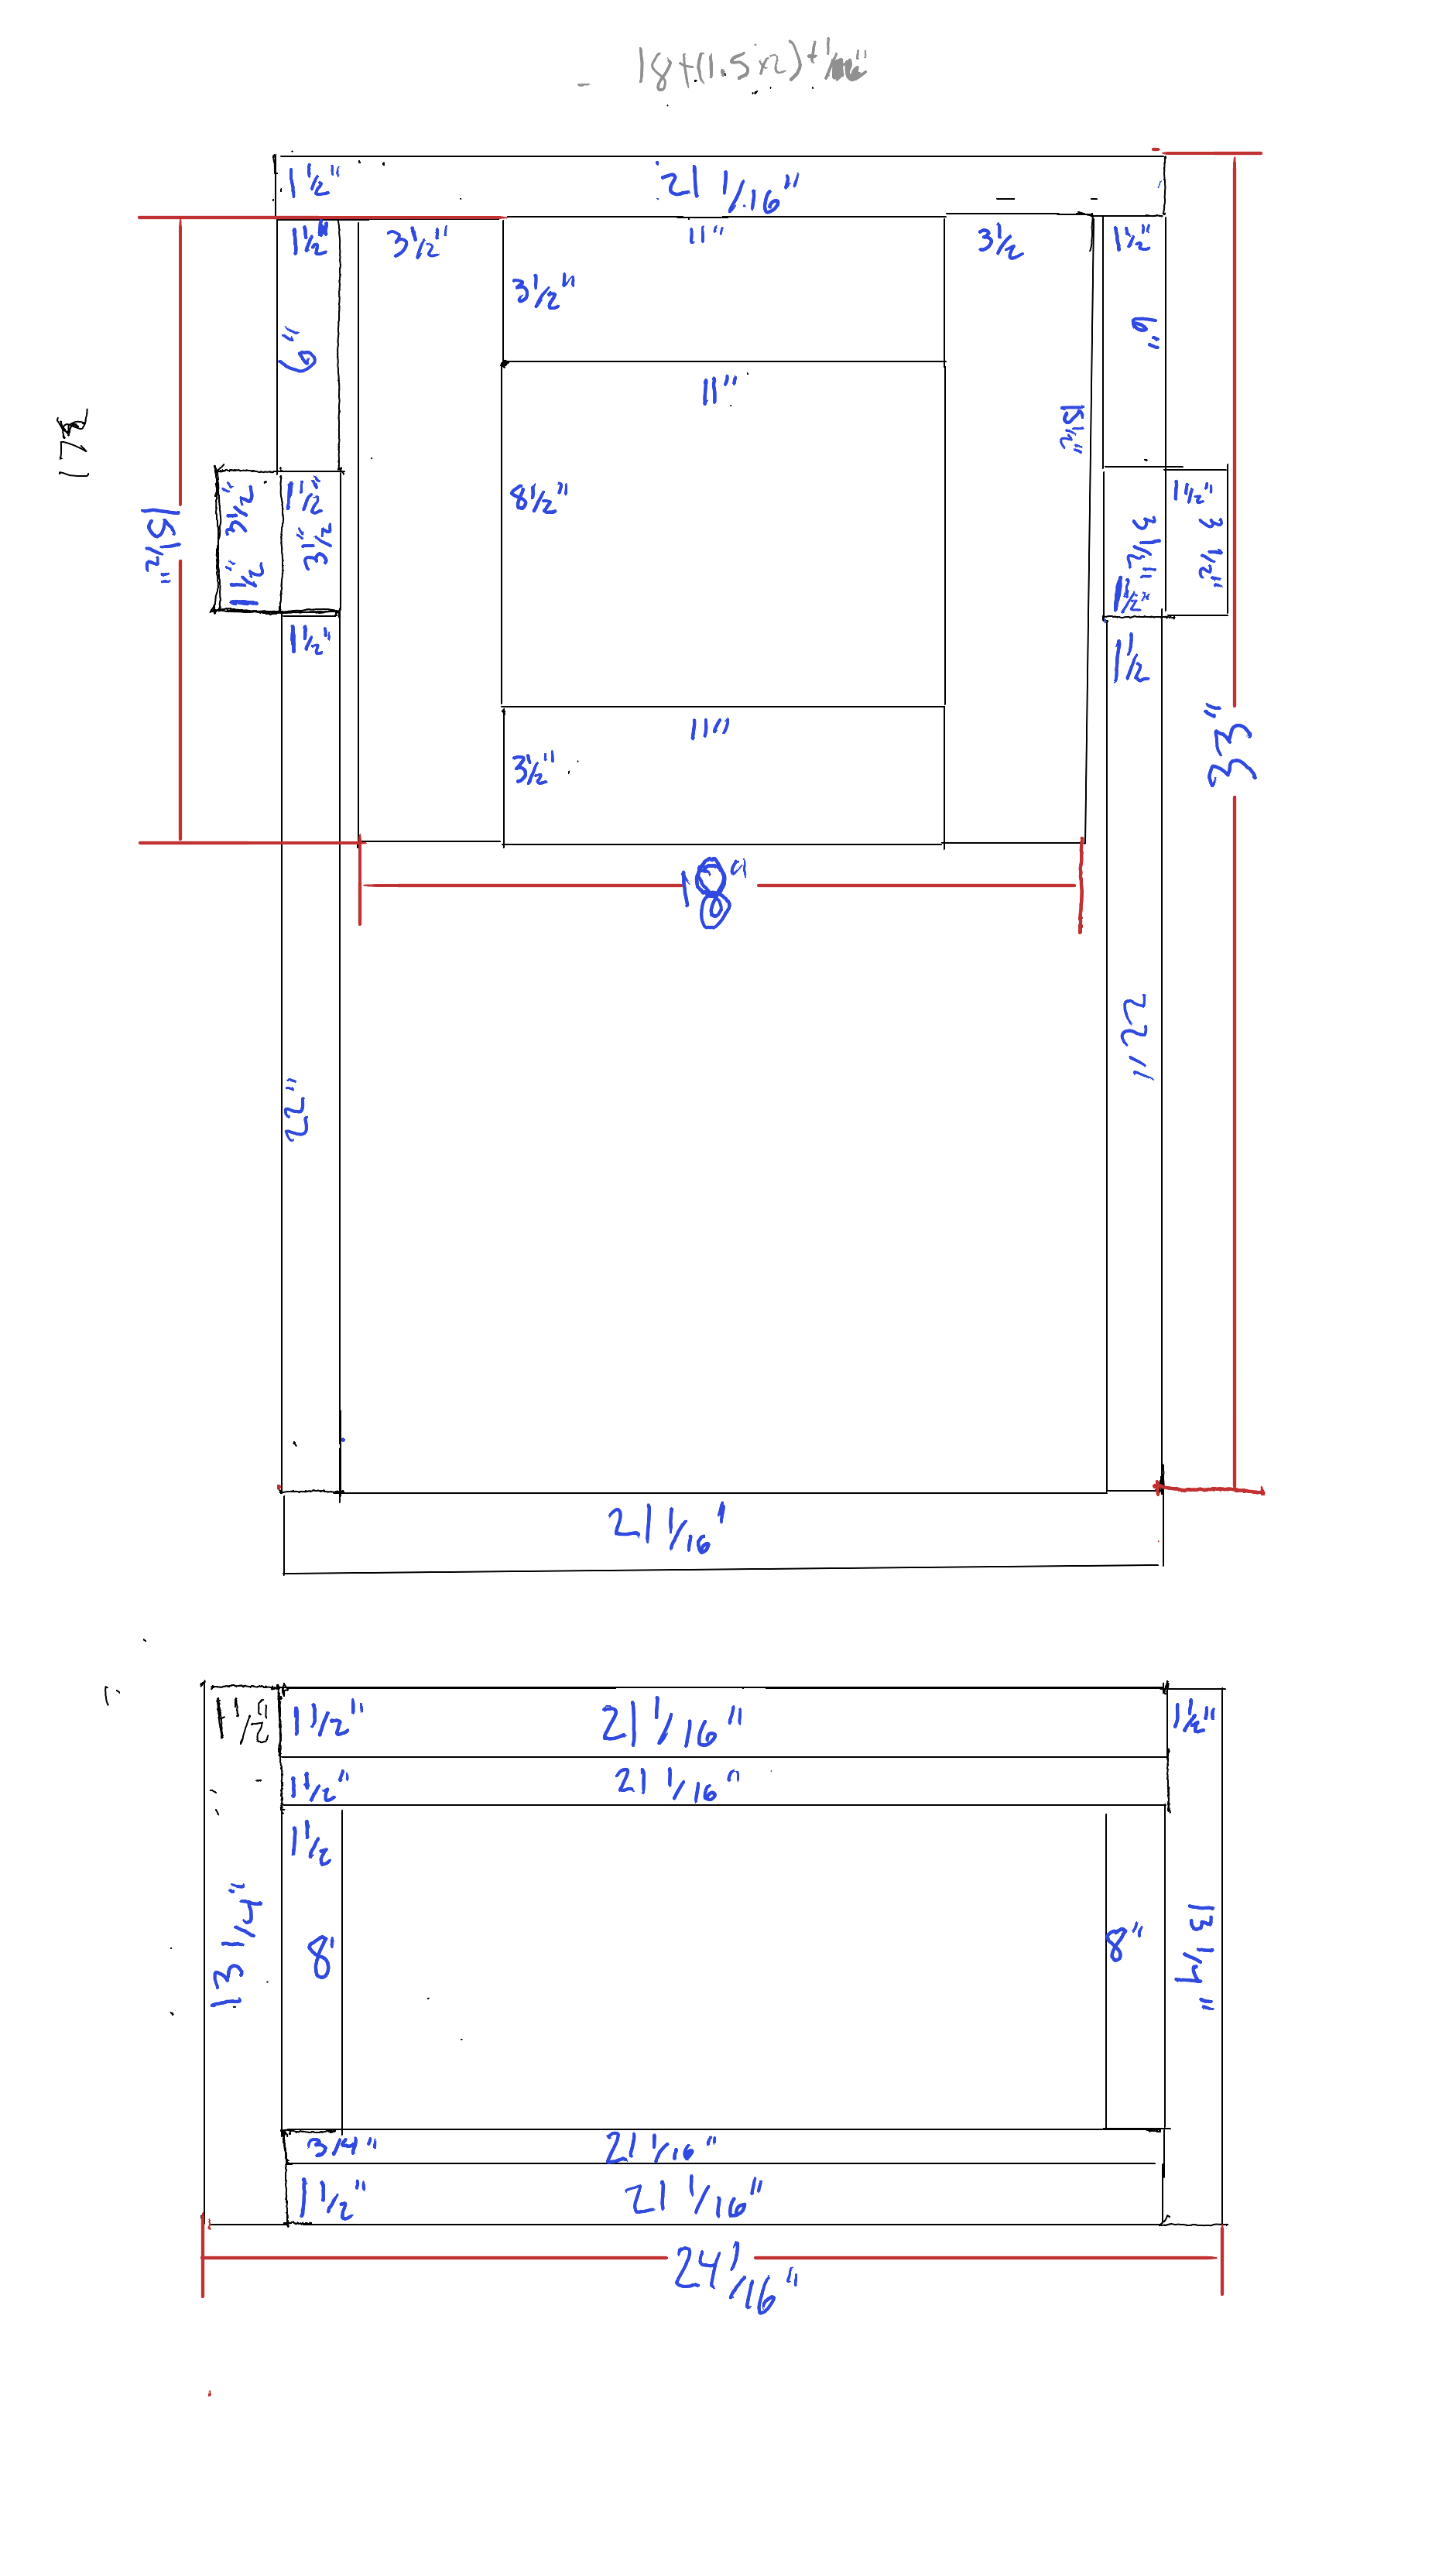
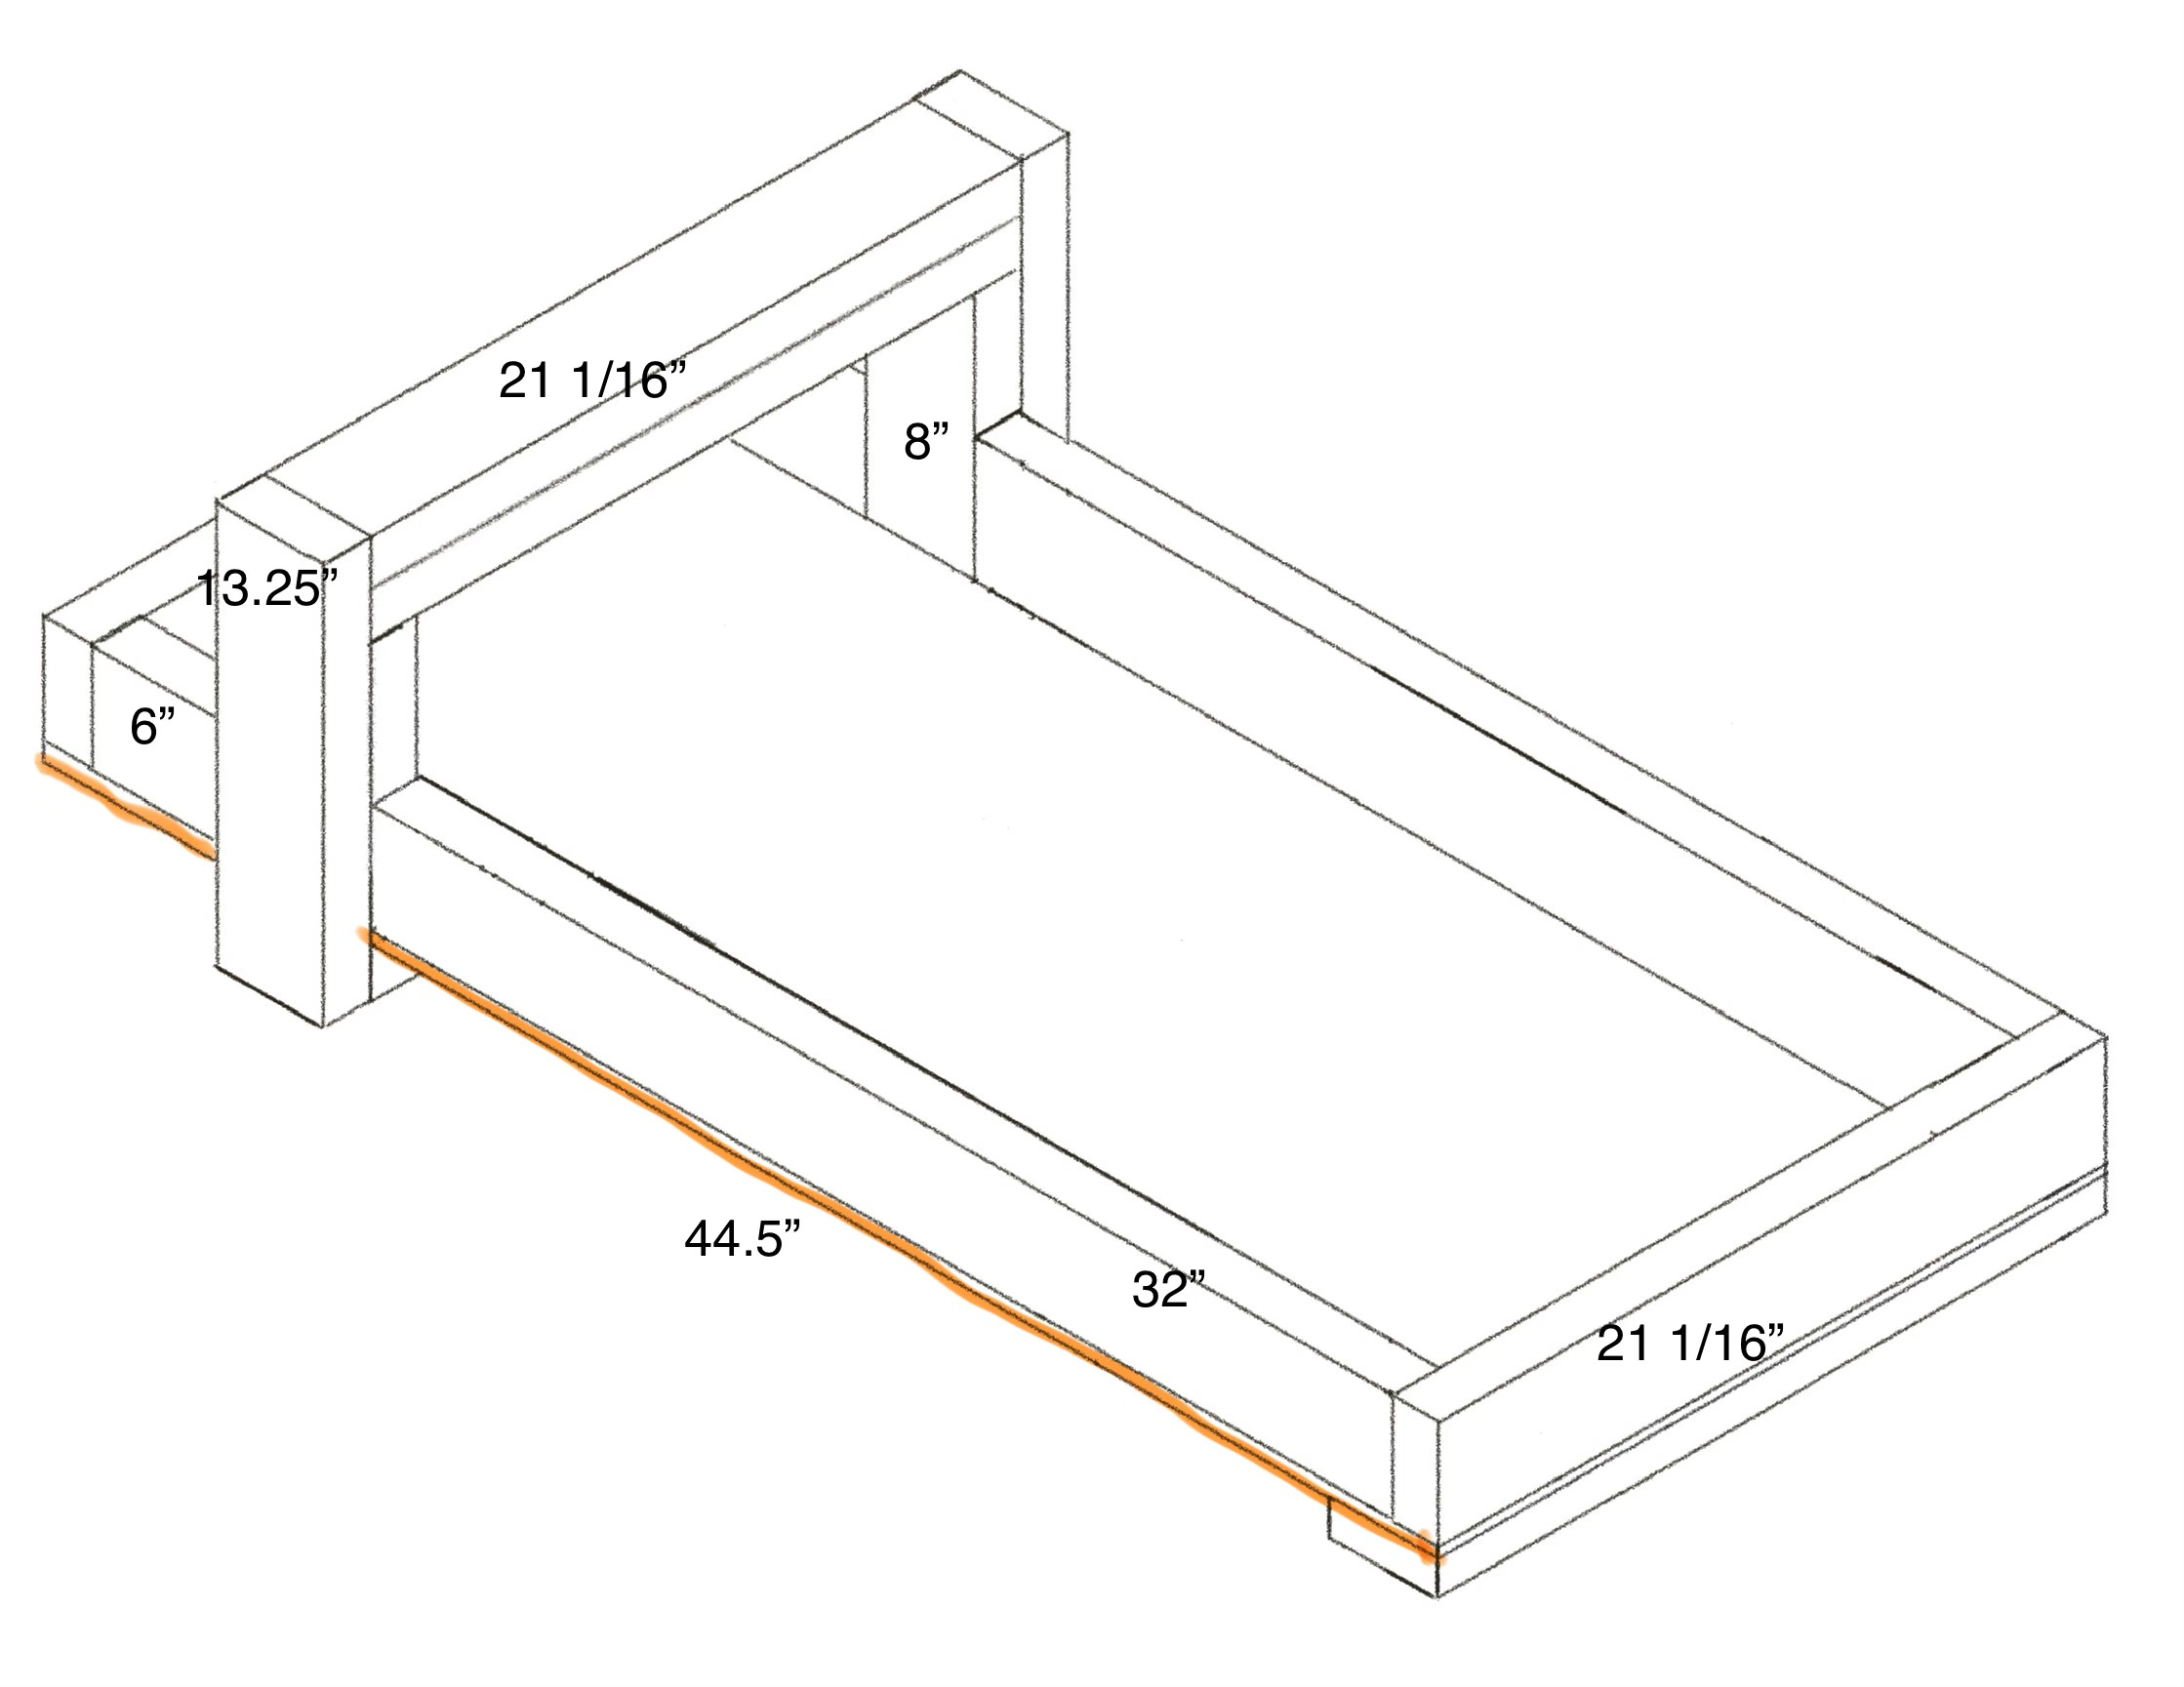
Part 2: Assemble the Bed
Once you have the coffin built, the next step is to assemble the bed. This step involves some degree of variance, but the most important thing is for the tray to be able to slide from one end of the bed to the other. The next important detail is that the coffin is centered under the press at the press end of the tray. The last critical consideration is that the coffin needs to be able to clear the platen completely when you are prepping for the print. You will want to adjust any of the following measurements to ensure these conditions are met, using the dimensions of the tray that you built in Part 1.
For this step you will need:
- One 3/4” piece of plywood measuring 44 1/2” x 21 1/16” 1
- Four 21 1/16” pieces of 2x4 2
- Two 6” pieces of 2x4
- Two 8” pieces of 2x4
- Two 32” pieces of 2x4
- Wood glue
- 22 2 1/2” construction screws
- Cut the wood to match the required dimensions. If you have any major variance in tray size from the details of Part 1, you may want to adjust at this time.
- On one end of the plywood, take the 32” pieces, the assembled coffin, and one of the 21 1/16” pieces, and test the assembly of the bottom of the tray. Mark the boundaries of the 2x4s with pencil, and check that the distance from the edge of the plywood to the pencil marks is 1 1/2” in multiple locations, adjusting your marks as needed.
- Apply glue to the narrow edge of the 21 1/16” piece of 2x4.
- Place the glued edge onto the plywood such that the 2x4 is sitting squared against the bottom edge of the plywood.
- Secure the wood in place with 3-4 hand clamps.
- Flip the plywood so that the 2x4 is facing the ground. Then secure it using four of the 2 1/2” screws. While the screws do not need to be flush, it would be best for them to be as tight as possible. Spacing should be even but precision is not necessary.
- Flip the plywood back over and remove the clamps.
- Take one of the 32” pieces and apply wood glue to one of the narrow edges.
- Using the outline, place the piece of 2x4 on the plywood. This is a good time to check your measurements using the coffin and the unglued piece of wood to ensure things haven’t drifted.
- Use four hand clamps to secure the glued piece of wood in place.
- Flip the plywood so that the 2x4 is facing the ground. Then secure it using four of the 2 1/2” screws (if you have extra, adding a 5th wouldn’t hurt). While the screws do not need to be flush, it would be best for them to be as tight as possible. Spacing should be even but precision is not necessary.
- Flip the plywood back over.
- Repeat steps 8-12. When you repeat step 9, it might also be good to take one of the 21 1/16” pieces and the two 6” pieces and mock up the other end.
- Mock assemble and test the fit of the 21 1/16” piece and 6” pieces, and coffin. Also check to see if there is space for the 8” pieces to stand on their ends between the 6” pieces and the secured 32” pieces. If you didn’t mark the placement of the 21 1/16” piece and 6” pieces’ position in the previous step, do so now. Also make any adjustments needed so that the 8” pieces can be placed in your assembly.
- Glue the narrow edge of a 21 1/16” piece and place it squared to the other end of the plywood.
- Clamp the piece of 2x4 in place.
- Flip the plywood so that the clamped piece is facing the floor.
- Secure the 2x4 with 2 1/2” screws in line with step 6.
- Flip the plywood back over. Taking the tray and the 6” and 8” pieces, check that the coffin will be able to travel the length of the bed.
- Take one of the 6” pieces and glue one of the narrow edges.
- Place the 6” piece against the plywood, squared against the edge of the plywood and the 2x4 from steps 15-18. Secure it to the plywood with clamps. Before step 22, we triple-checked with the 8” piece of wood.
- Flip the plywood so that the clamped 2x4 is facing the ground.
- Using 3-4 2 1/2” screws, secure the 2x4 to the plywood. The guidance in step 11 holds.
- Flip the plywood upright.
- Repeat steps 19-23.
- Place one of the remaining 21 1/16” pieces under the plywood where the gaps for the 8” pieces will go.
- Place the remaining 21 1/16” piece under the bottom end of the print bed.
- Square the piece under the bottom against the end of the plywood, and attach it by driving 4 1” construction screws through the plywood. These need to be flush. See Part 1, Step 8.
- Square and secure the piece placed in step 26. Secure using 1” construction screws through the plywood. Follow the guidance in the previous step.
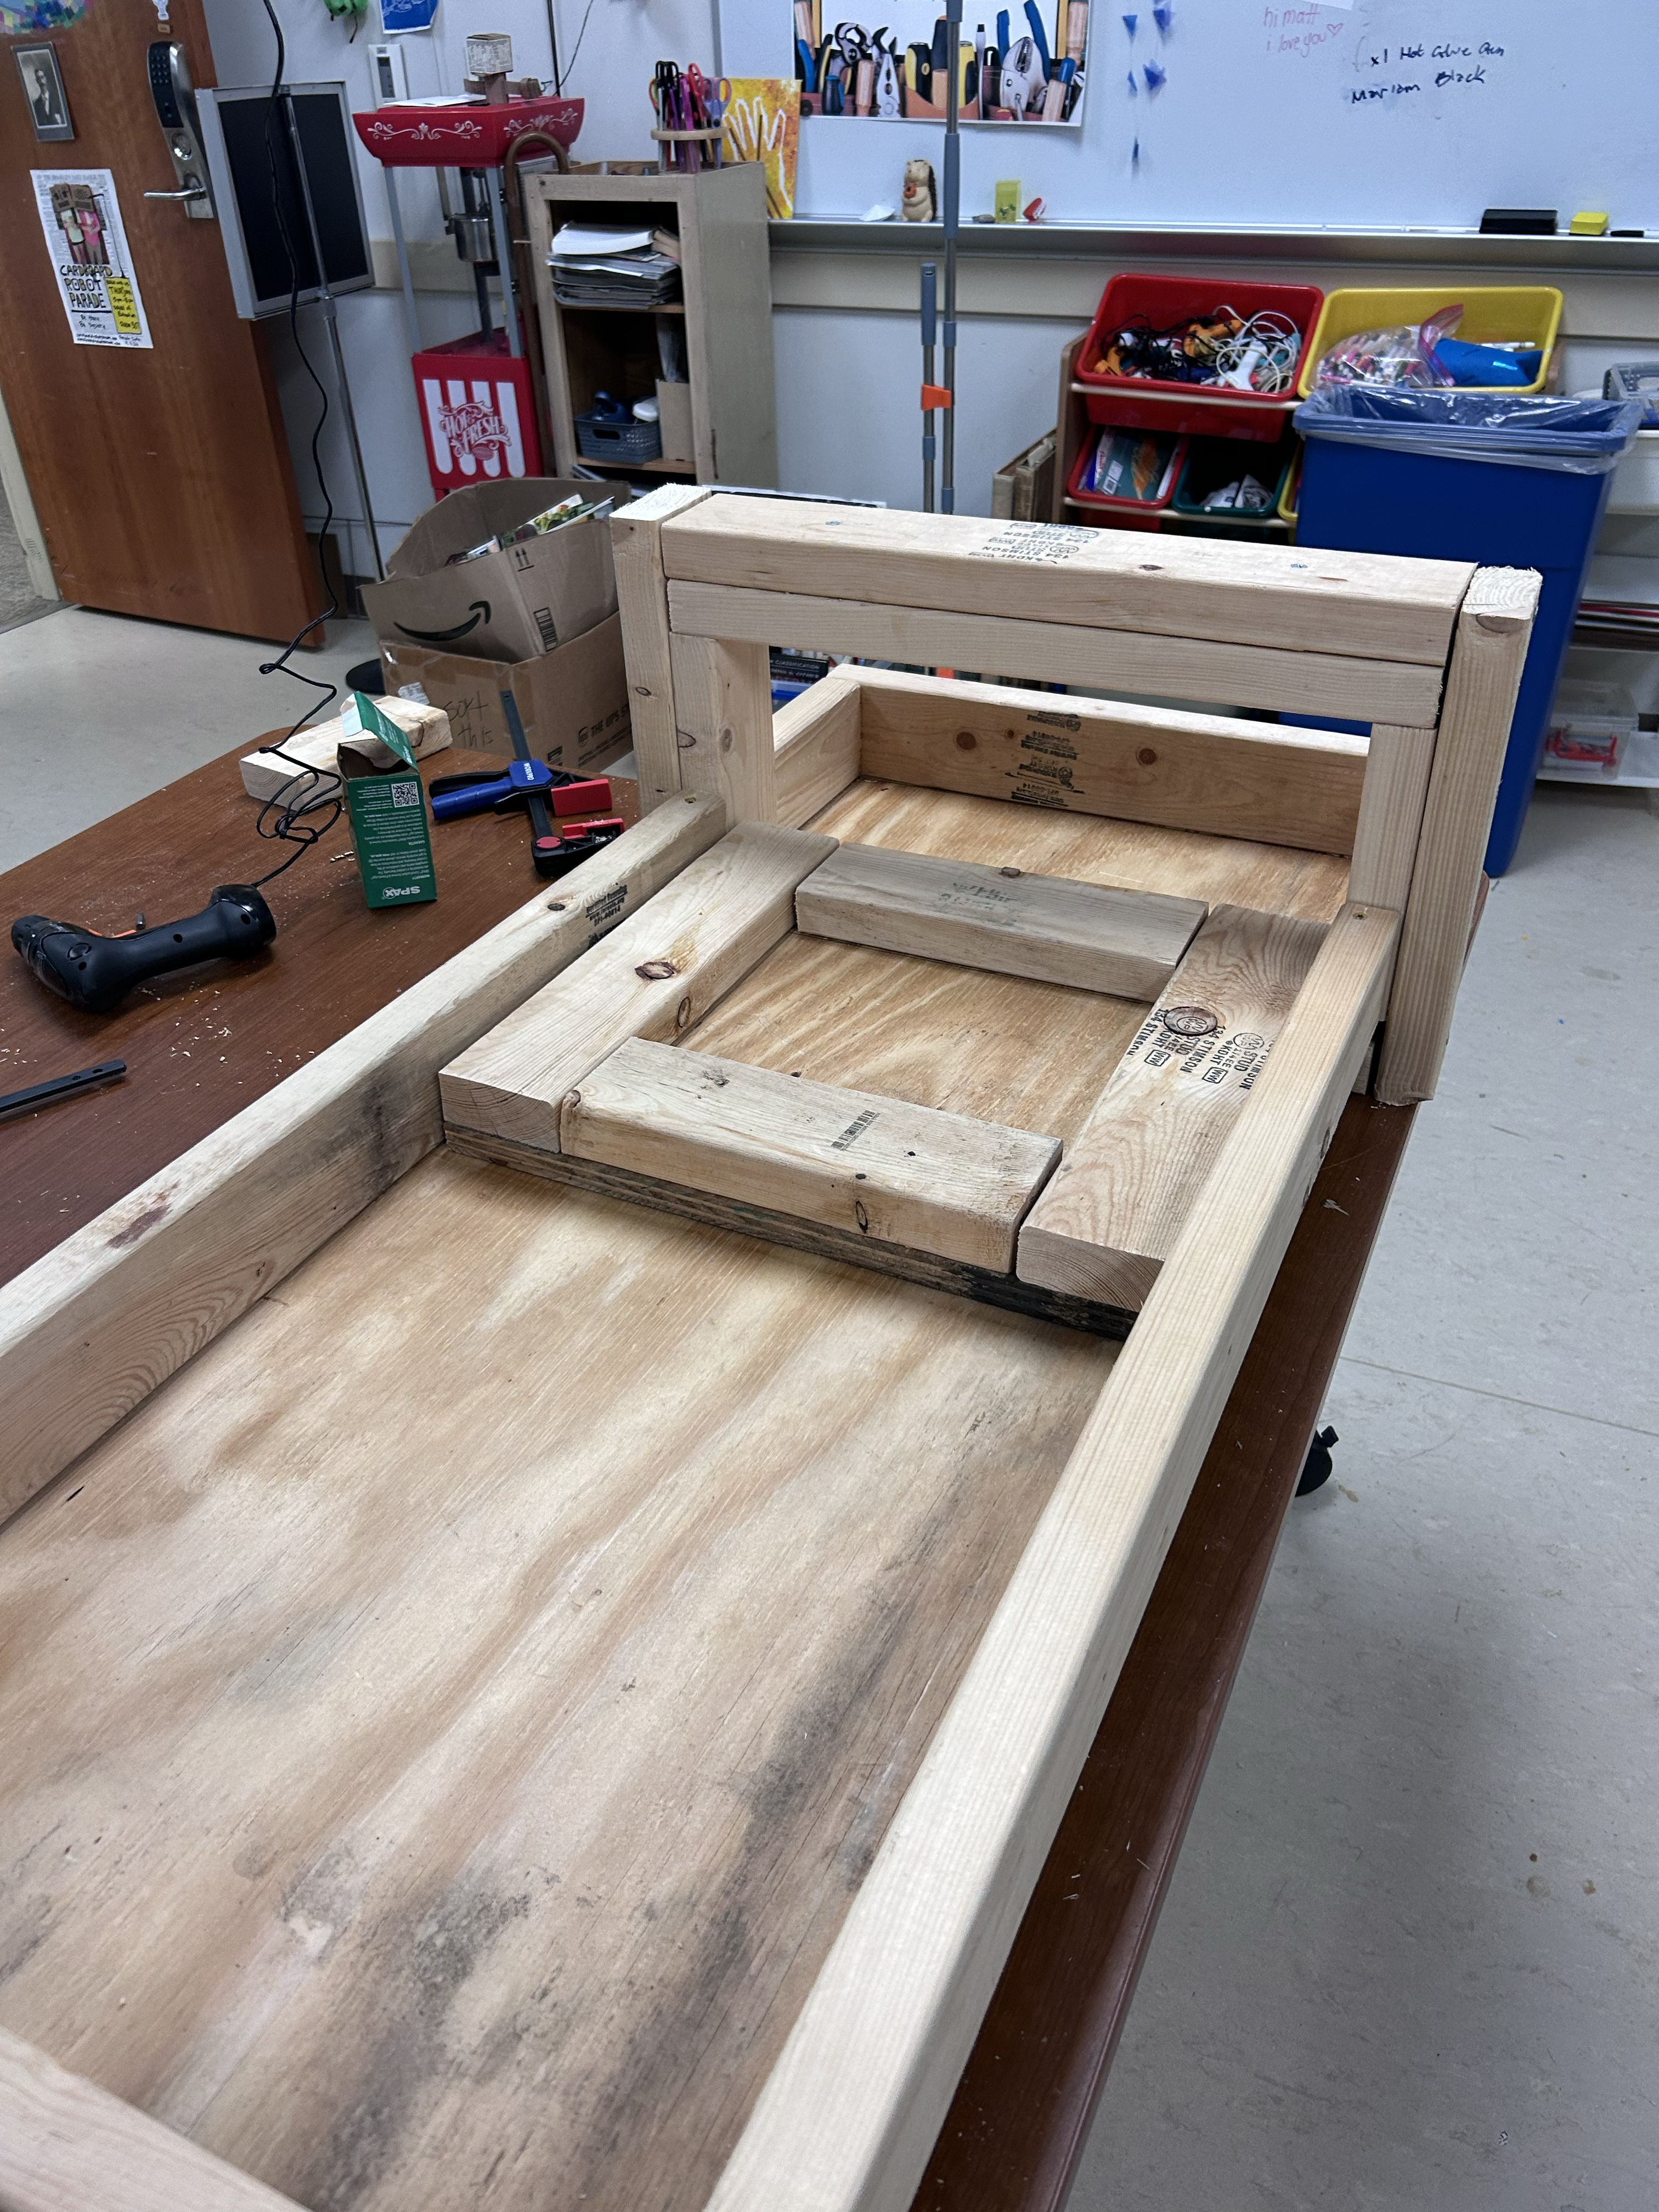
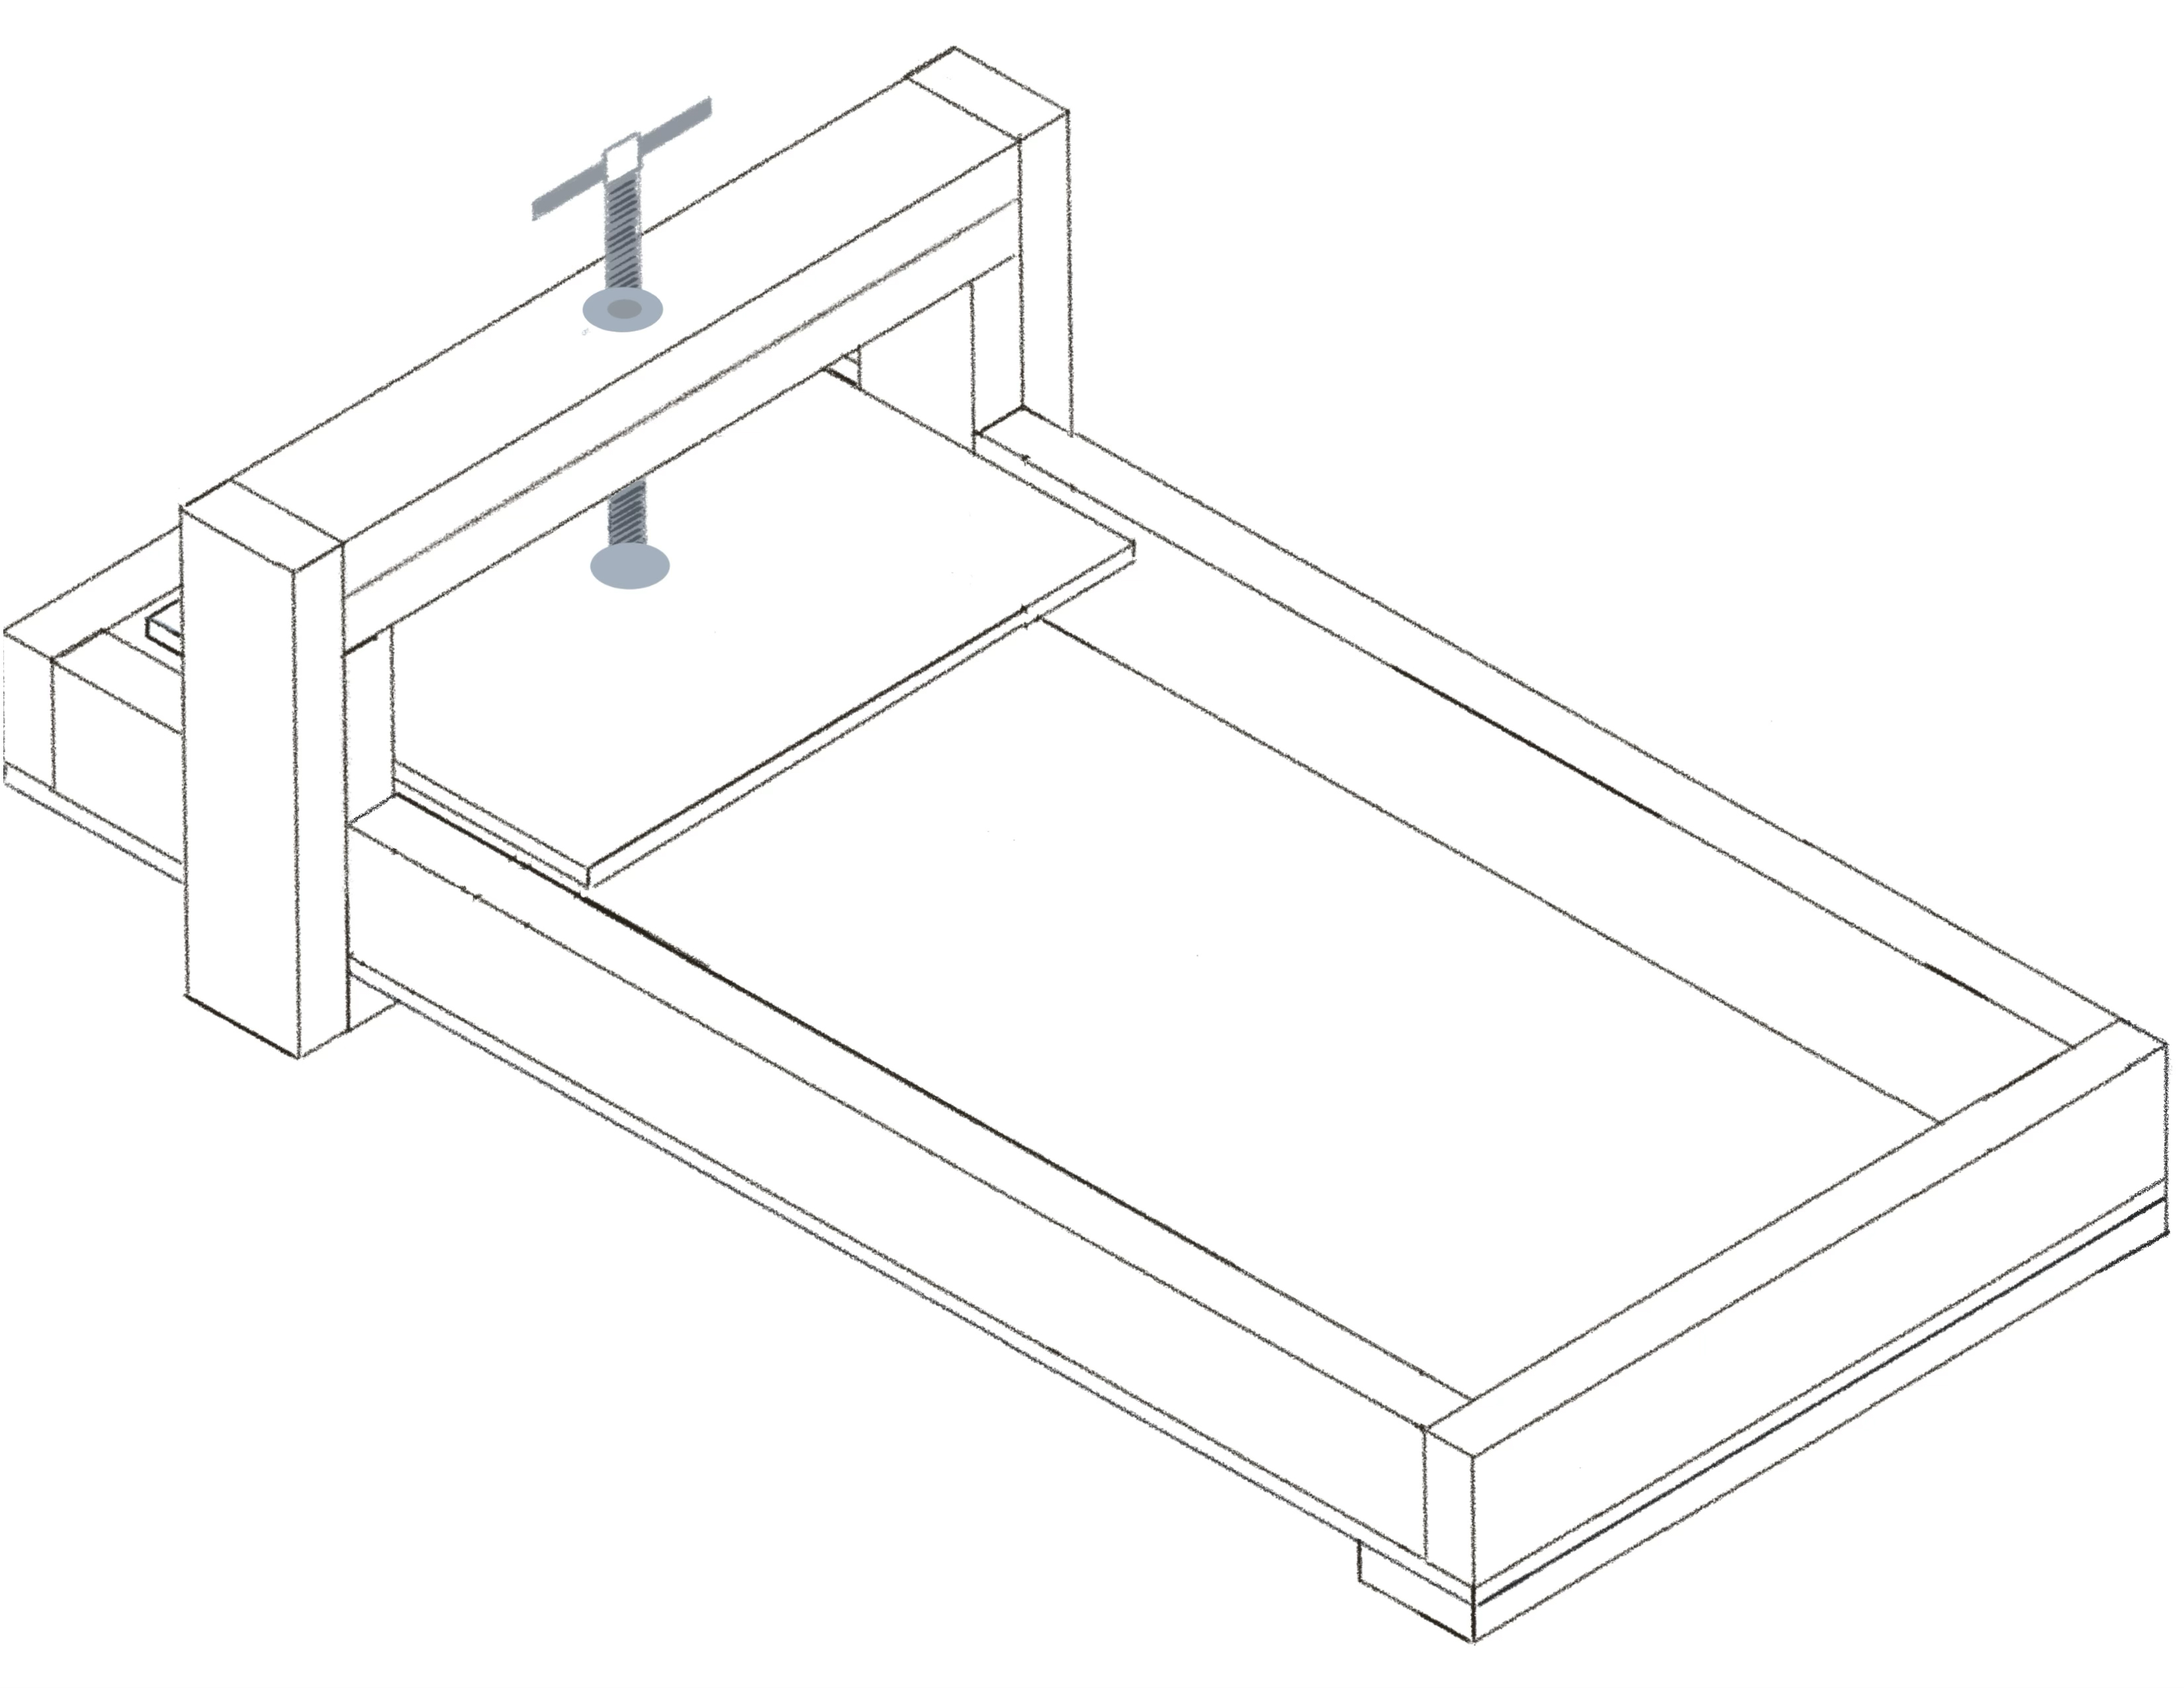
Part 3: Assemble the Press Mechanism
*image
The press assembly is fairly straightforward.
You will need the following materials to complete the press mechanism:
- The two 8” pieces of 2x4 from Part 2
- A 15.5” x 18” piece of 3/4” plywood
- Two 21 1/16” pieces of 2x4
- Two 13 1/4” pieces of 2x4
- A 3/4” threaded rod (we used 2’)
- Three 1/2” threaded floor flanges
- A 3” PVC shower drain
- 16 1” construction screws
- 20 2 1/2” construction screws
- Place the 8” pieces standing on their ends in the gaps between the 6” pieces and the 32” pieces.
- Using a drill bit, drill diagonally oriented pilot holes into the horizontal pieces of 2x4, continuing into the vertically oriented pieces.
- Using the 2 1/2” construction screws and the diagonal pilot holes from step 2, secure the 8” pieces to the neighboring horizontal pieces. They wobbled a bit at this stage for us, but will be secured later.
- Glue the wide edge of one of the two 21 1/16” pieces.
- Place the two 21 1/16” pieces together. Align the edges. Secure with clamps.
- Using four 2 1/2” construction screws, bolt the 2 pieces together, and remove the clamps. You will want to keep these screws away from the center.
- Place the finished piece on top of the 8” pieces from steps 1-3.
- Take one of the 13 1/4” pieces of 2x4, and apply wood glue to one of the wide sides.
- Place the glued edge against one of the 8” pieces, and align the bottom edge of the glued piece with the 21 1/16” piece of 2x4 from Part 2, Step 26.
- Use clamps to secure the 13 1/4” piece in place.
- Use two 2 1/2” screws to attach the glued piece to the 21 1/16” piece of 2x4. Then use two screws to attach it to the 8” piece of 2x4. When you’re done, the screws should form an abstract T pattern.
- Unclamp the 2x4s.
- Repeat steps 8-12 on the other side of the press.
- Take two 2 1/2” screws and use them to attach the glued 21 1/16” pieces in place. Don’t make these overly tight, as you will be removing them in a later step.
- Use the 1” circular saw bit to drill a hole in the center of the glued piece of 2x4. This should be centered approximately 10 17/32” in and 3/4” into the assembled pieces. This will take a while and will be difficult if you don’t have a corded drill, but it is possible. Be patient and experiment to find the right torque, speed, and pressure to make consistent progress.
- Remove the screws from step 14.
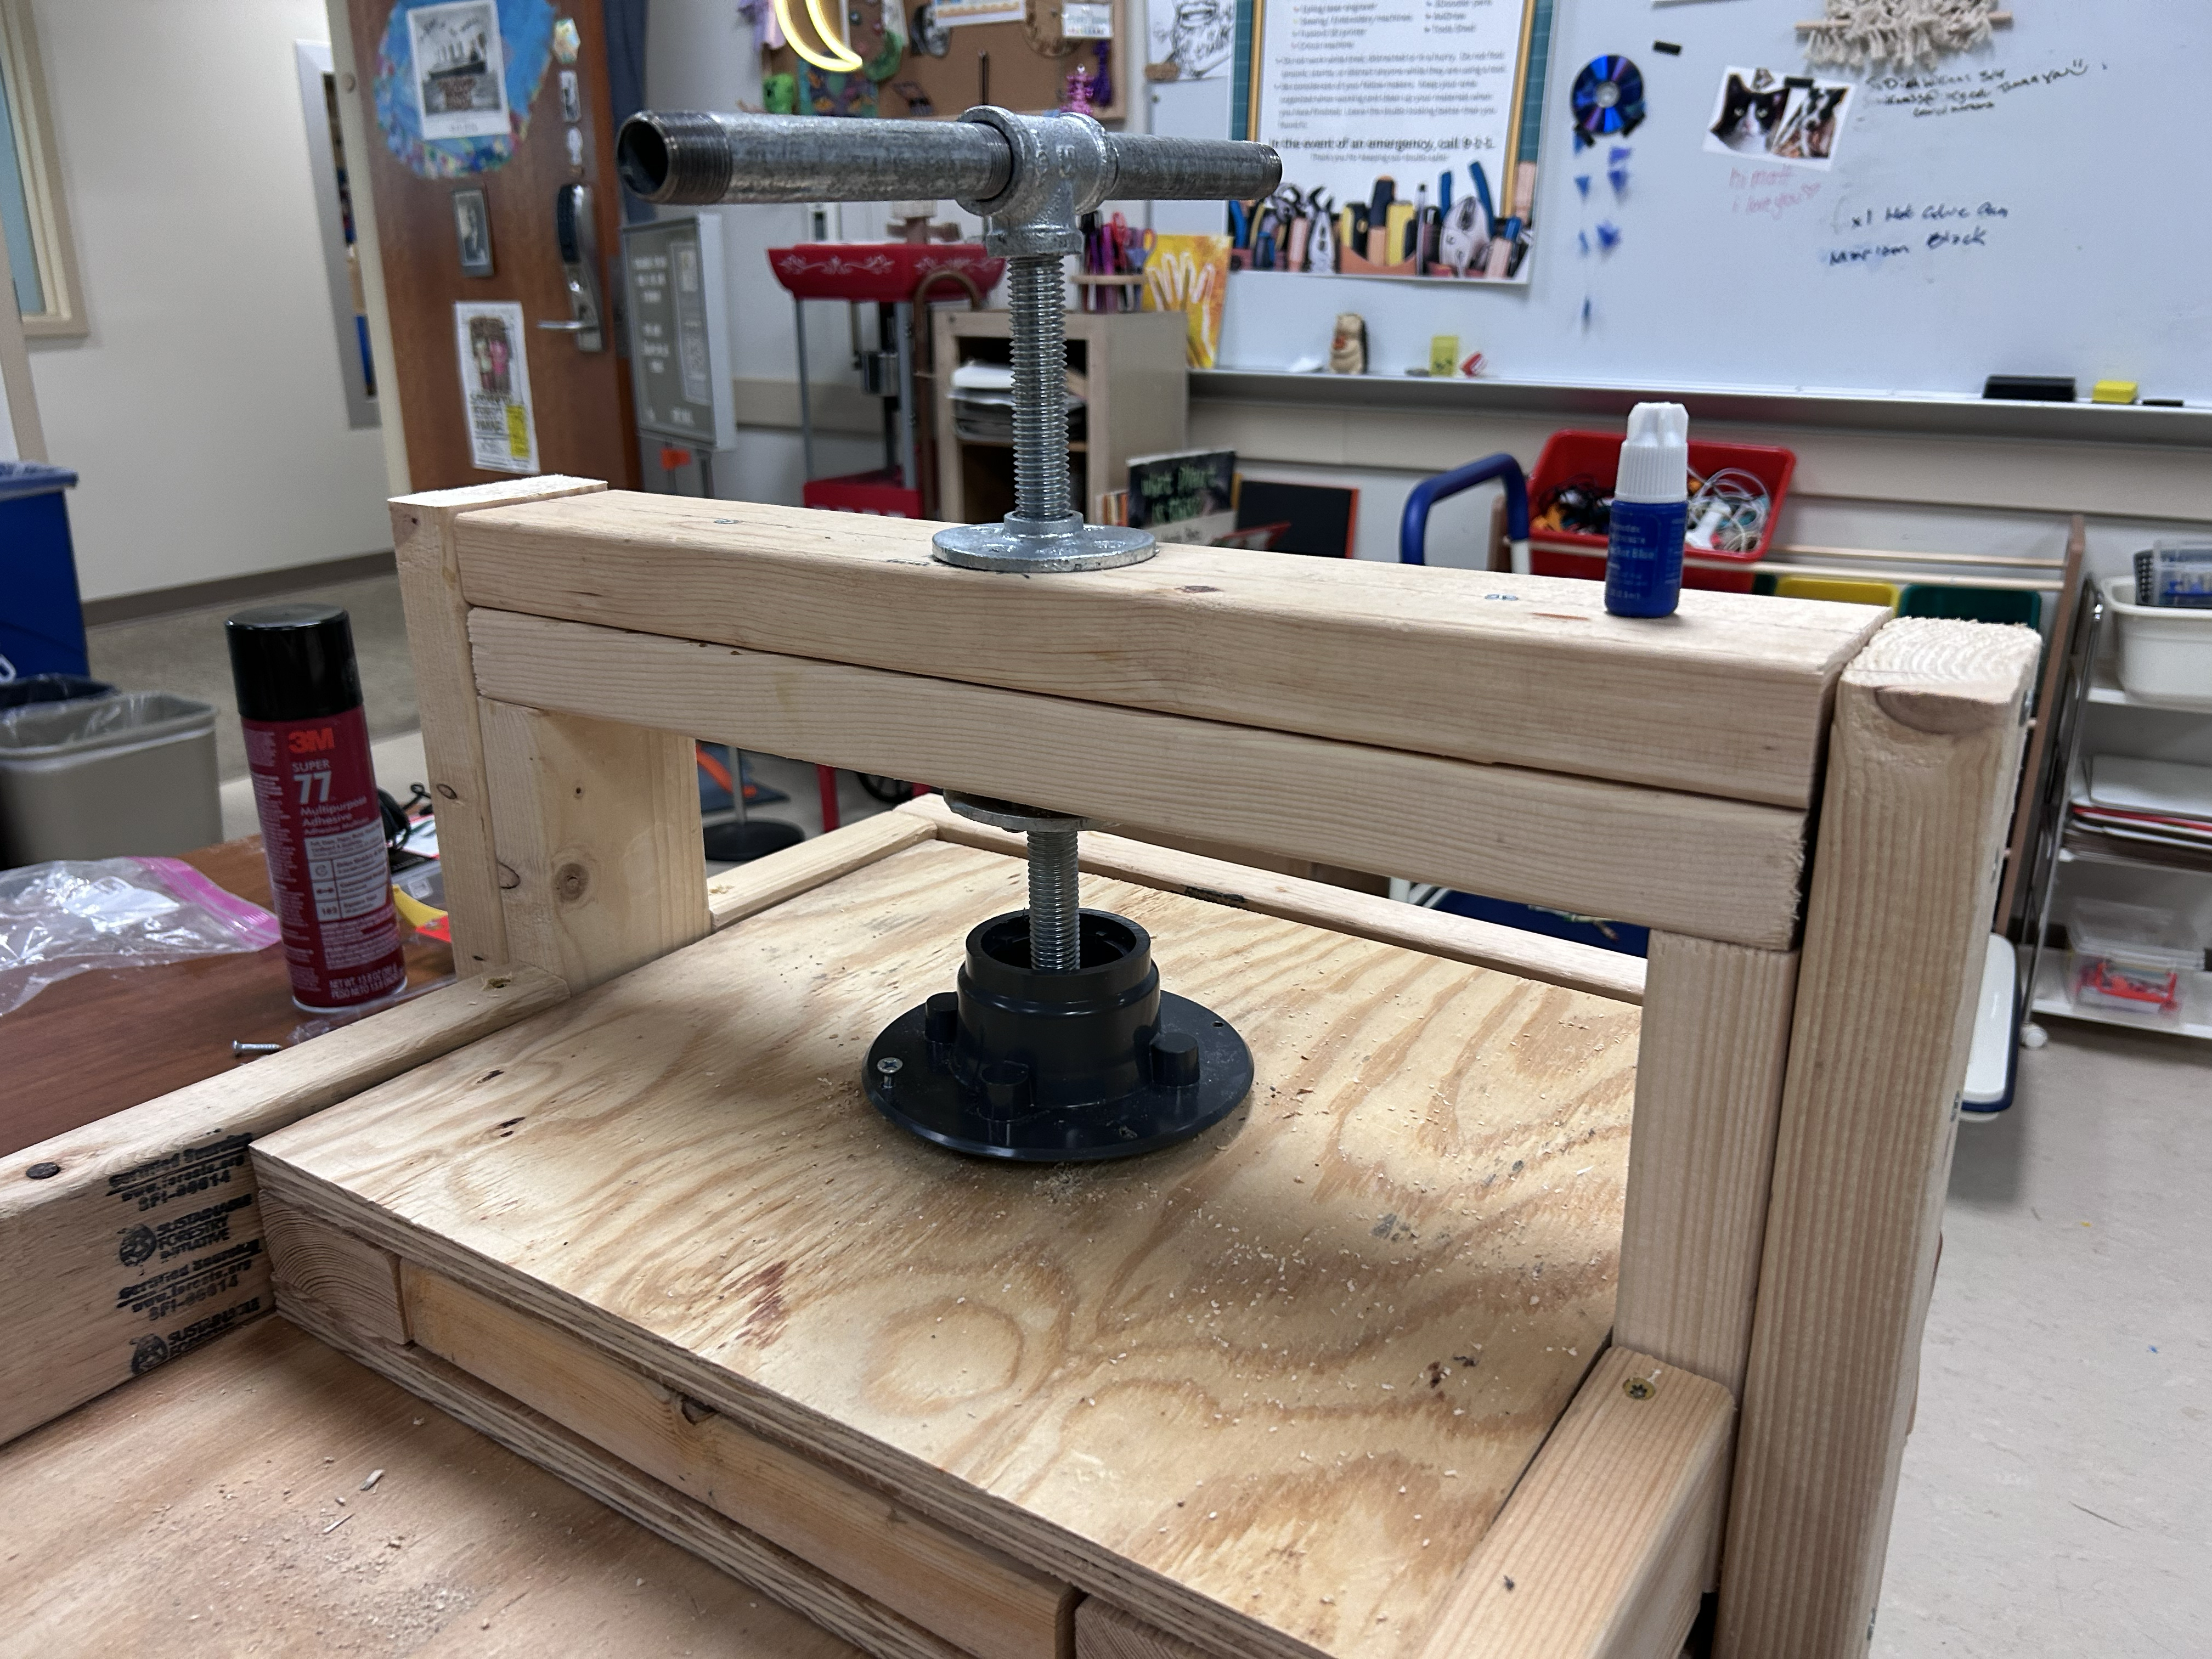
- Take one of the floor flanges and screw the 3/4” threaded rod to it until there is approximately 6” sticking out below the base of the flange.
- Place the rod and flange onto the 21 1/16” assembled pieces such that the threaded rod is sticking out the bottom through the hole you have made in them, and the flange is resting on the top of the pieces.
- Take one of the remaining flanges and screw it up the end sticking out the bottom until the top of it is against the glued pieces.
- Use a wrench or pliers to tighten the two flanges against the glued pieces as much as possible. There should be travel along the rod in both directions until a significant amount of force is being applied. Loosen the flanges slightly.
- Use 8 1” screws to attach the flanges to the 21 1/16” pieces.
- Remove the bolts from the shower drain, and remove the inner PVC piece.
- Cut approximately 1” to 1 1/2” off the narrow end of the shower drain.
- Place the coffin in the bottom of the print bed. Move it so that it rests against the top and under the threaded rod.
- Place the 15.5” x 18” piece of 3/4” plywood on top of the coffin.
- Attach the tee joint and two six-inch pieces of pipe to the top of the threaded rod.
- Place the flange against the 15.5” x 18” piece of 3/4” plywood, roughly where you think the threaded rod will touch if it were to be fully extended downward.
- Place the shower drain over the threaded flange.
- Using the tee joint and pipe ends, rotate the threaded rod so that it descends to the 15.5” x 18” piece of 3/4” plywood.
- As the rod descends, adjust the placement of the floor flange and shower drain so that the rod screws into the floor flange.
- Using four 1” construction screws, attach the shower drain to the 15.5” x 18” piece of 3/4” plywood.
- Reverse the rotation of the rod to lift the platen.
- Lower the platen again. Unscrew the shower drain and remove the flange from the end of the rod.
- Apply red thread lock to the bottom of the rod following the directions. We used steel wool to clean the parts ahead of time with some WD-40.
- Reattach the flange, and screw until the platen is pressing firmly down on the coffin.
- Holding the rod securely with a wrench or other gripper, unscrew the tee joint from the rod, apply thread lock to the threads inside of the tee joint, and screw it firmly onto the rod. The tighter the threads are connected the better.
- Wait 24-48 hours and screw the shower drain to the 15.5” x 18” piece of 3/4” plywood.
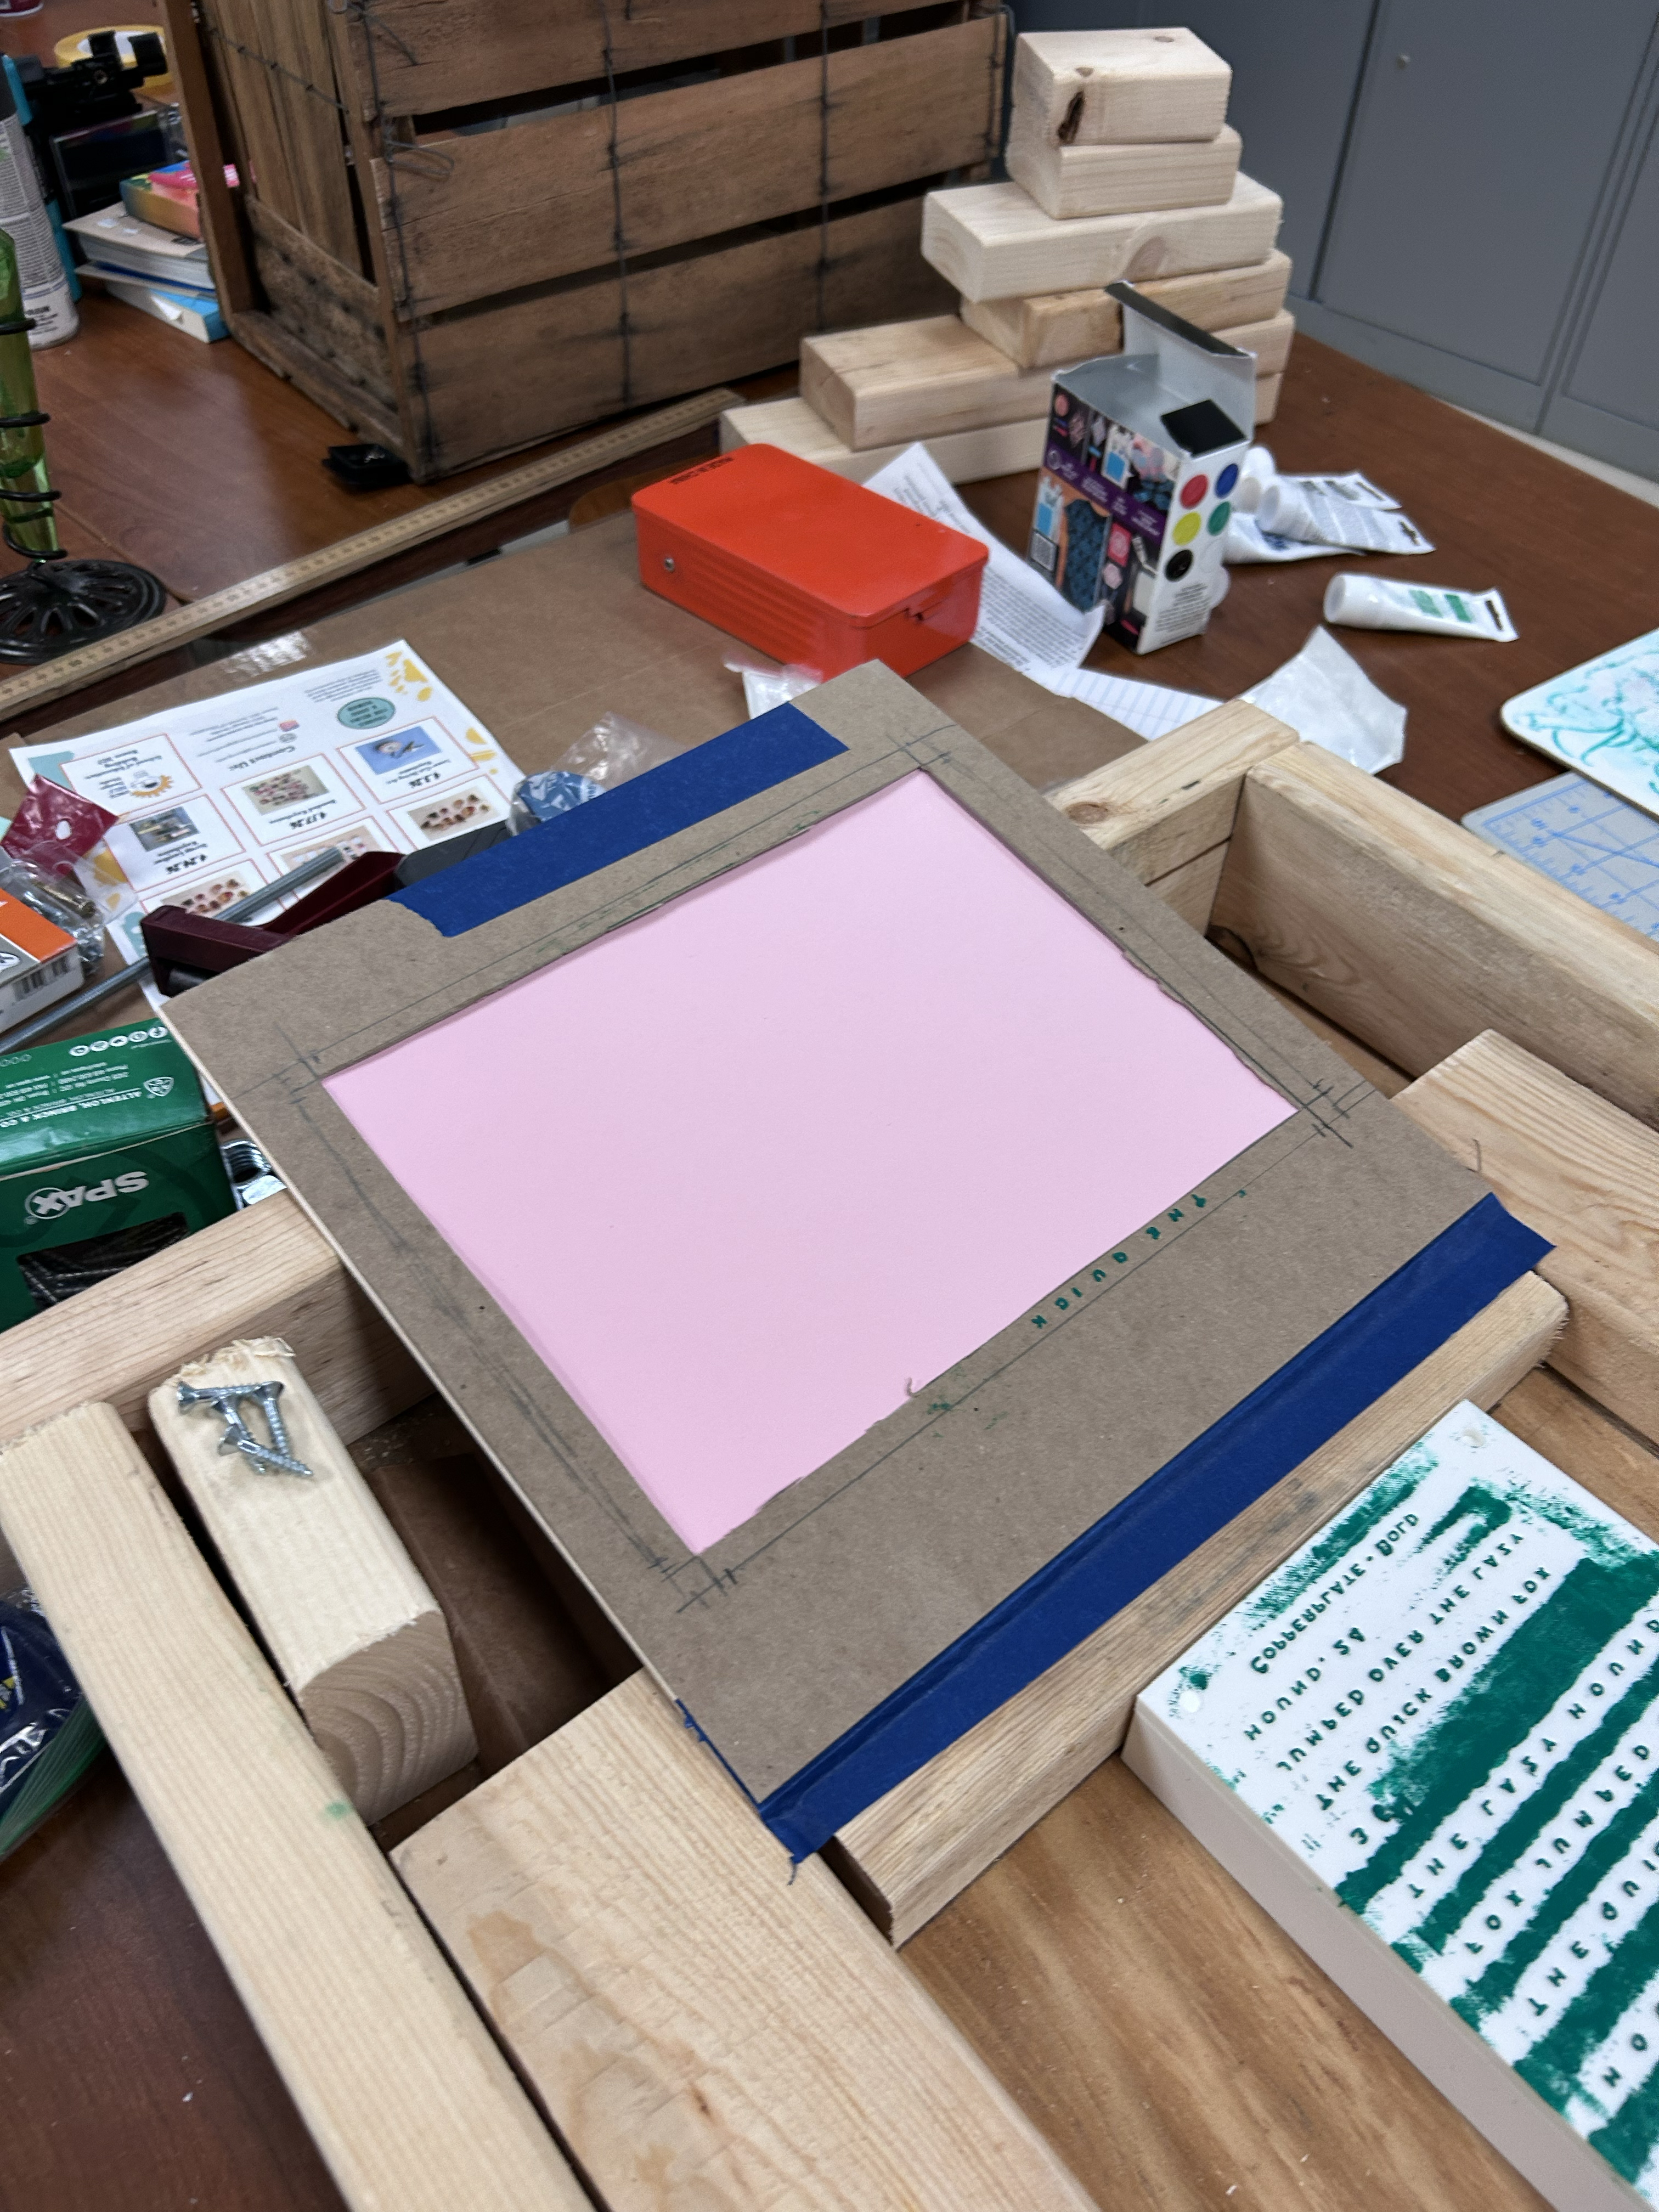
Part 4: The Tympan and the Frisket (Optional)
At this point the printer is mostly done. To solve several problems with printing, Gutenberg and later printers used two mechanisms to ensure uniformity between prints: the tympan and the frisket. We used a 12x12” piece of 1/8” craft plywood we had lying around for the tympan, and a piece of poster-sized card stock to build the frisket.
Supplies needed:
- Tape (wide painters tape is easiest, but duct tape should also work well)
- 1/2” 19-gauge bright brad nails
- 12x12x1/8” plywood
- One sheet poster-sized card stock

- On a cutting mat or other safe surface, use a razor blade to cut a piece out of the card stock that as closely as possible approximates the size of the sheet of plywood.
- Draw a straight line on the card stock 1 1/2” from one of the edges.
- Rotate the card stock 90 degrees, and draw a line 2 1/4” from the edge.
- Rotate the card stock 90 degrees, and draw a line 1 1/2” from the edge.
- Rotate the card stock 90 degrees, and draw a line 2 1/4” from the edge.
- Cut out the rectangle you have created in the center of the card stock.
- Take a piece of tape off the roll and attach it to one of the edges where you drew the 2 1/4” line, so that half is on the card stock and half is not attached to anything.
- Attach the unattached tape to the edge of the plywood such that the piece of card stock is now hinged to the plywood.
- Tear another piece of tape and attach it to the back side of the card stock and plywood to reinforce the hinge created in the previous step.
- Fold the card stock against the plywood and flip it.
- Taking the plywood, measure 6 inches down from the opposite edge of the hinge and draw a line.
- Measure along the line 1 1/4” from one edge and make a mark. Repeat this from the opposite edge.
- Measure 6 inches from one of the edges that the line intersects. Make a mark approximately 1/2” up from the edge opposite the hinge.
- Take three 1/2” 19-gauge bright brad nails and hammer them into the tympan where you have made the marks.
- Flip the piece of plywood and ensure that the nails have pierced the card stock and that it is able to lay flat against the plywood.
- Taking a wire cutter or hacksaw, cut the pointed ends off the nails just above where they emerge from the card stock. This will create a pin register that is a bit safer and less likely to interfere with the printing process.
- Place the tympan and frisket, card stock side down, over the coffin, with the tape side towards the press assembly side of the press.
- Center the plywood over the 8.5” x 11” cavity.
- Tear a piece of tape and put it on the bottom of the tympan running along the edge to create a hinge between the tympan and the coffin.
- Flip the tympan up along the tape hinge, ensuring that it stays squared with the coffin. Tear and apply a piece of tape to form an interior hinge.
That’s it. Assuming your thread lock did its work, you should now have a working printing press.
Notes: